I bought ATtiny85-20PU from mouser.com. This chip has an internal clock and can do 1 Mhz and 8 Mhz.
I believed it is shipped set to 1 Mhz, which will not work with the Adafruit NeoPixel.
Here are a few reminders.
- Download Arduino 1.6 or greater
- Installing the ATiny85 configurations in the Arduino IDE
- Click File -> Preferences and enter the following url in field Additional Boards Manager Urls
- https://raw.githubusercontent.com/damellis/attiny/ide-1.6.x-boards-manager/package_damellis_attiny_index.json
- Click Ok
- Follow this tutorial to install the ATtiny configurations: Programming an ATtiny w/ Arduino 1.6 (or 1.0)
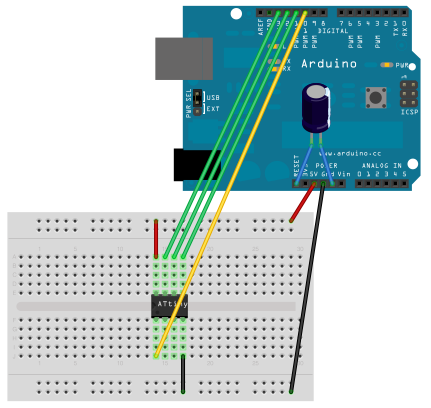
- I am using an Arduino Uno to program the ATtiny85, configured as follow
- If you are using a programmer to upload the code to the ATitny85, you still need to reset the fuse once.
- Load the sketch -> Examples -> ArduinoISP
- Compile
- Upload into the Arduino Uno
- Load the Exemples -> 01.Basics -> Blimk
- In the menu tool select
- Board: ATtiny
- Processor: Attiny85
- Clock: 8 Mhz (Internal)
- Port: Com port used by the Arduino
- Programmer: Arduino As ISP
- Fuses
- This is the tricky part. It is necessary to reset the clock of the chip.
It is a one time operation.
From the menu Tool, click Burn Bootloader
- Now you can upload the code from NeoPixel Code from Adafruit.It should work.

No comments:
Post a Comment